Sunday, December 21, 2008

Winter Solstice Beads

First Batch

I just made these beads to celebrate Winter Solstice. Or more accurately, to celebrate the shortest day of the year because tomorrow the days get longer. Hooray! I don't normally revel in winter or winter colors, so I thought I would challenge myself to use a limited palette of blues, white, and lavender.

I made my first batch (above) of Winter Solstice beads using some simple cane techniques, trying to come up with different bead looks using the same colors. I was reaching for my silver leaf to use in mokume gane, when I realized I didn't have any silver leaf, just gold and copper. So instead of doing mokume gane, I grabbed my Pearl Ex Powdered Pigments and mixed some blues and lavenders into translucent clay, and then swirled the pigmented translucent with white, and the resulting second batch of beads (below) remind me much more of winter than the first ones I did. I like these so much that I am going to make more using different colors.


Now the next thought process will be to make a necklace out of some of these to wear this season, so I can tell Old Man Winter that he ain't got me down, I'm using him as inspiration.

Thursday, December 18, 2008

Faux Amber and Turquoise Beads


I haven't posted any new polymer activity in awhile, 'tis the season I guess. Busy busy with Christmas stuff, and unfortunately none of the busyness had anything to do with polymer. So here is a necklace I made awhile back. I made all the beads out of polymer (except for a recycled glass and some silver beads and spacers).

I love the mix and match, asymmetrical type of necklace. One book that has inspired me recently is Beadazzled- Where Beads & Inspiration Meet by Penelope Diamanti. I bought the book in a bead store a couple months ago and have really been inspired by the combination of natural material beads such as coral, turquoise, amber, ivory, and more made into necklaces. This book is eye candy, not a how-to book. The inspiration for me is to recreate some of these natural materials in polymer and be inspired by the eclectic designs. If you like eclectic and asymmetry, this is a very inspirational book.


Friday, November 14, 2008

Mudcloth Beads--Sort Of

Longest tube bead: 2 1/2", biggest donut bead: 1 3/4"


I've been wanting to do some donut as well as large tube shaped polymer beads, and here are some black and white ones I just made. I was inspired by the mudcloth technique in Judy Belcher's book, Polymer Clay Creative Traditions. She has two interesting techniques for mudcloth in her book, but I improvised a little from her technique.

I carved the designs using a linoleum cutter v-gouge. I'd like to find a better quality carving tool as I want to do more precise designs than the tool let me do. But in trying to recreate the primitive African tradition of mudcloth, it looks pretty close.

One hint for success: if you want to carve through to an underneath color, make sure your top sheet of clay is reeeally thin. As thin as you can make it.

Monday, November 10, 2008

My Blogging Polymer Friends

I am currently compiling a list of polymer artists who blog...you can find it in the right hand column of this blog. It is a fairly new feature of Blogger, and I really like it as it connects like-minded people together. I have made a list of painting blogs I watch on my art blog, carengoodrich.blogspot.com. but I am finding it more difficult to compile a list of blogging polymer artists.

So I wanted you to know that there are some fine polymer artists who are not on my list. It is unfortunate but true. Some polymer artists have blogs but rarely update them. I also don't bookmark/add artists who use half or more of their blog to post non-art stuff.

I hope more polymer artists will have dedicated polymer blogs soon. It's free on Blogger.com, so why not keep in touch with other polymer artists in a painless way? You don't have to update every day, (I don't), but since we polymer people are scattered all over the place, why not start building links with each other through blogs?

Thursday, November 06, 2008

Faux Coral Beads


I made some faux coral beads using the instructions in Tory Hughes' book, The Chameleon Clay. I made them a little more misshapen than Tory's examples. I like the natural look of the odd shapes. This is my first batch, I'm sure when I make them again I will tweak the recipe and shapes even more.

If you want to make your own coral, turquoise, jade, ivory, or other natural beads, consider making your own out of polymer clay. Think how much money you'll save by buying a bit of polymer instead of buying the real thing!


Thursday, September 25, 2008

As Good As It Gets

I just read a blog entry by polymer artist Kathleen Dustin about the shallowness of Fashion Week in New York City, and her being uncomfortable about her polymer purses and jewelry being sold to that market.

I commented on her blog that her polymer work inspires me:

"So many of us have been lifted to greater heights by seeing your work. At the end of the movie As Good As It Gets, Jack Nicholson said to Helen Hunt: 'You make me want to be a better man.' Well, Kathleen, the inspiration of seeing your polymer creations makes me want to be a better artist."

So my point is to let the shallow folks be shallow, there's not much you can do for them. Those depth-less souls will carry her purses or wear her jewelry just because they saw it on Madison Avenue. But although Kathleen readily teaches her techniques to those wanting to learn, she (and the rest of us) may never know the full range of influence she has had on polymer artists to think big and do their very best work.

Tuesday, August 26, 2008

My Polymer Beads on Flickr

I just pulled together a collection of my faux ivory polymer beads and posted it on flickr. Now you don't have to scroll down my blog to see what kind of beads I make. All are available for sale, please inquire or look for them in my etsy store. Please click on the flickr badge on the top right of this page to access the photos.

Saturday, August 16, 2008

Polymer Beads and Pendants on Etsy

One of a kind polymer horse pendant necklace with mosaic background. It sold hours after I listed it on etsy!

I've listed some more polymer beads and pendants on etsy. We are getting past the summer buying doldrums so I will be increasing my sales listings as we march into autumn!

Friday, August 15, 2008

Fairplay Bead & Fiber Show

My display at the Fairplay Bead and Fiber Show


This past weekend I sold my handmade polymer beads at the 7th annual Fairplay Bead and Fiber show in Fairplay, Colorado. The foot traffic was steady all day Saturday, with a mix of beaders as well as non-beading tourists looking for gifts to take home. I did pretty well in selling my beads to people who appreciated the organic, vintage look and had good feedback from people.


The weather is fast changing in Fairplay, you always have to have your eye on the sky when at an outdoor event. The weather stayed really nice all day Saturday, and a rainy downpour only happened after the show was over for the day. The attendance dropped off significantly on Sunday as the weather was more threatening, but the good sales on Saturday made the show well worth doing and I hope to be back next year!

Tuesday, July 29, 2008

Busy Making Polymer Beads

Building up stock for my bead display

I'm very busy making lots of polymer beads for the August 9-10, 2008 bead show in Fairplay, Colorado. My signature beads are faux ivory made from my own designs featuring birds, fish, horses, rabbits, and more. I will also have some mokume gane beads to add some color to the neutrality of the ivory.

I may have the smallest display at the bead show. I have no tent and plan on bringing just two 4 foot tables. It all has to fit in my Prius! I am somewhat ready for rain despite the lack of shelter, I will bring plastic to cover my tables with and a raincoat and umbrella. I will be at a disadvantage if it rains, compared to everyone else who will have a canopy tent for people to duck into, but that's ok, the rain doesn't usually last long. I am keeping it simple this year, and if I do well, I'll buy a tent for future outdoor shows.

Tuesday, July 08, 2008

Fairplay Bead & Fiber Show

Front Street where the bead show will take place.

I took a driving trip over the weekend to Fairplay, Colorado, the site of the Fairplay Bead & Fiber Show on August 9-10, 2008. This is an annual outdoor event put on by lampwork bead artist Pat Pocius. Fairplay is 85 miles southwest of Denver, and 28 miles south of Breckenridge.

Pat Pocius' South Park Pottery, Bead Store and Lampwork Studio


I got a booth and will be there selling my polymer beads. So far I am the only polymer bead maker to sign up. If you are in the area, stop by! I'll have a full report of the show and how it went.

Thursday, July 03, 2008

Polymer Beads on Etsy

Faux ivory focal beads by Caren Goodrich

I am currently lining up some new polymer beads to list on etsy, I plan on debuting them on July 7th. So once this weekend's fireworks are over, I'll have the offerings up and running. Hope to see you on etsy next week and have a great Fourth Of July!

Tuesday, July 01, 2008

Coast to Coast Texture

Eucalyptus seed capsules

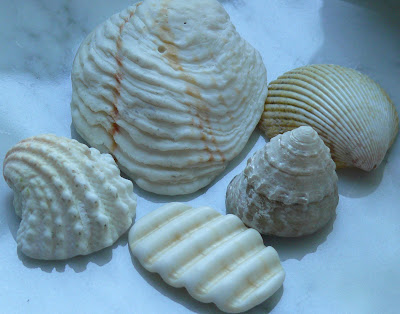
Here are some of my favorite texture tools from nature to impress into clay. I reject the use of store-bought texture plates. I prefer to discover my own! My first choice is always the amazing things from nature, and the items shown take you from coast to coast in the USA.

The first photo shows eucalyptus seed capsules from Napa, California. I was on a plein air painting trip a couple years ago and while painting under a eucalyptus tree, I noticed these on the ground and started picking them up. They are like having little stamps! I was surprised at the different design in some of them. They are wood-like and never fall apart. So keep your eye peeled for these little gems if you are in California, or the eucayptus' native Australia.


Florida shells

Now we travel across the US to the beaches of Florida, where shells and shell pieces are easily found. While visiting Florida a couple winters ago, I was away from my art studio but got my art fix by getting up early to beach comb for texture tools.

The big shell in the back has a nice ripple to it, which when stamped onto clay makes nice waves. The one on the left makes a nice gesture/movement impression, with it's dot-dot-dot spray of curved texture. The one in front I call a "potato chip", they are all over the high tide line and make a more symmetrical impression.

Friday, June 13, 2008

Exploring The Rainbow With Tina Holdman

Tina Holdman's Collection #3- "When The Dark Comes In"

During the Dayle Doroshow polymer workshop in Colorado Springs in April, participant Barb Harper brought in a new spiral bound book she compiled of Tina Holdman's polymer color recipes, reprinted from the Mile High Polymer Clay Guild newsletter from 2004-2008. I bought one and have been having fun mixing up samples of the color collections. Here is one of the sixteen recipe pages in the book. I made little square samples and glued them right on the page.

Tina has an interesting and inspiring story with each color collection. She also has a great sense of humor and is fun to be around....I just wish Tina and some of the others in the Denver and Colorado Springs Polymer Clay Guilds had their own web pages! I can't find much of their work online.

Cutting out squares for color mixing

For those who haven't done color recipes, the measuring is easy. I roll the clay to a #1 thickness and use a clay cutter to cut out squares. The squares are then all the same amount of clay. Each square represents four parts, so it's easy to cut the square and follow the recipes for "parts".

I then mix the parts together to get the new color and cut a new square for the sample tile.

Thanks, Tina and Barb, for sharing your knowledge and creating this book!

Wednesday, June 11, 2008

Trout Stream Pendants


Here are some of the results of my Trout Stream color palette (see a previous post). I made faux ivory fish, backed by a mosaic using the inspiration and colors of Trout Stream. The largest one (middle) is 1 1/2" x 2", the other two are slightly smaller. They will debut on etsy in the near future.

Thursday, June 05, 2008

Foredom Bench Lathe


I ordered a Foredom bench lathe from Donna Kato's Prairiecraft.com polymer clay supply site, it arrived in two days! But there's only one imposing mountain range between where Donna lives and where I live, so the fast arrival wasn't a total surprise as UPS and Donna's husband Vern do a good job in getting things out fast.

I put on the muslin polishing wheel, plugged in the bench lathe and proceeded to put a wonderful shine on my polymer work. I have never been a fan of applying a clear coat of anything over my polymer, and with the ease of using this bench lathe, I can't imagine why anyone would want to. It's money well spent and polishing polymer is fun, mesmerizing and relaxing. I was pulling out all my previously-shined-with-denim beads and putting a new shine on them with the bench lathe.

The lathe is small, the footprint is 5" x 6", and it runs very quietly and coolly. I am very cautious about buying new machines and supplies, as I try not to clutter up my workspace with regrettable art supply purchases. For anyone serious about polymer, this bench lathe is a must-have. I highly recommend it. Also, the lathe is made in the USA. Foredom is a company established in 1922 in Connecticut.

Wednesday, May 28, 2008

Color Palette: Trout Stream

Two things happened a couple days ago. First, I read a blog entry by Heather Powers at Art Bead Scene asking us to name one thing in nature that is our biggest source of inspiration in our jewelry designs. I answered: Autumn colors.

That is the short answer. The long answer encompasses more...when it is spring or summer and there are no autumn colors, I am in search of colors in nature that are something other than green. The trees are green, the grass is green.....cool green dominates the landscape. So when I see reds, oranges, warm yellow-greens or purples, I am very inspired to do a painting or create that color in polymer.

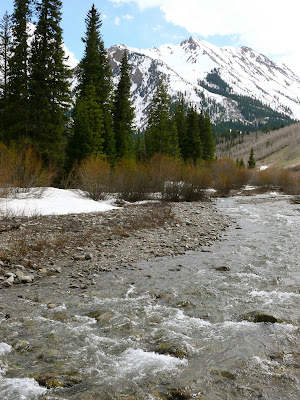
Castle Creek

Later that afternoon, I found myself alongside Castle Creek near Aspen. I admired the rocks in the creek, and marveled how warm those rock colors were despite being under cold rushing water. The only blue in the water was a bit of sky reflection.

Closeup photo of the colors in Castle Creek

The colors in rocky mountain creeks are always a great inspiration to me. And despite the fact that spring has barely sprung in the high elevation of upper Castle Creek, the water colors are reminiscent of the autumn colors I like. The next day created a color palette I call "Trout Stream", based on the colors I found in the above abstract-like photo.


Trout Stream Color Sample Tiles

I have an idea what I am going to do with this collection of colors, now that I spent a good part of the day mixing them. I am going to work on some jewelry sized polymer mosaic pieces, and I'll post the results here.

In the meantime, check out Tish Collins' color palette of polymer mosaics. It's wonderful.

Friday, May 09, 2008

Life Long Mold Making

This morning, without warning, I decided to blog about my mold making history. So here is a very brief retrospective:

I've loved making things out of molds since I was a kid...I used to have a Creepy Crawler set in the 1960s, I was fascinated by being able to pour "goop" into a mold, heat it and come out with a rubbery bug. After that childhood introduction, I never used any more molds until I was an adult, but you could say the die was cast.

A few of the hundreds of horse rubber stamp designs I made in the 1990s

In 1989, I started my own rubber stamp business called True West Designs. I had molds made from my own original artwork (I never used clipart), then pressed sheets of uncured rubber into a vulcanizer to create each rubber stamp. I did very well with my stamp business, having started it just a couple years before the stamping craze hit. I did all the production myself, and during the peak mid-1990s I used to get wholesale orders for hundreds of stamps at a time. I was extremely busy and made some good money for a lot of years.

In the mid 1990s, I started sculpting horses and making my own plaster molds for slip casting. In 1996, I spent a day with Joan Berkwitz of Pour Horse Pottery in Carlsbad, California, and Joan kindly shared a lot of mold making tips with me.

"Hipshot" a pony I sculpted in 1999 and cast using a four piece plaster mold

Manatee ornaments I made in 2001

I started beading in 2000, and that evolved into making my own ceramic beads. I sculpted originals and made two piece plaster molds for slip casting. It was a much simpler process than the more complicated model horse molds, but still labor intensive.


Manatee ornaments and beads in progress, in the greenware state after slip casting in 2003. Shown are fish, frogs, horses, turtles, etc.

Back in my ceramic days, it was hard to imagine ever giving up earthen clay for polymer clay. But that is what happened, as I have found the imitative techniques and ease of polymer mold making and casting to be very appealing. I can work out my ideas with less time from conception to realization. I used to have to cast many ceramic pieces to fill the kiln before firing, and the lag time was really frustrating, not to mention the less than great results I'd often get.

So here I am at my current state of evolution. I made these beads this week out of polymer using the imitative ivory technique:

Imitative ivory press molded beads-2008

Tuesday, April 22, 2008

Dayle Doroshow Workshop: Messengers & Storytellers

Messengers & Storytellers

Day two of Dayle Doroshow's polymer workshop was Messengers & Storytellers. We spent the day making figures, learning the techniques for making them and embellishing them with canes and mokume gane that we brought from home. This is normally a two day class, so we had to cram a lot of ideas into one day.

One of my ideas, sparked by a freeform method of collage that Dayle had us do, was a polymer figure I called "What To Wear?" My figure is a funny looking woman who isn't as good looking as she thinks she is, and her attire (various canes applied to her body) was all over the place color and design-wise. Maybe some in the class thought I had no feel for combining colors....but it was intentional on my part as I wanted this figure to be odd looking.

The above photo shows her in the middle with her soul mates, the fish (left) and bird (right). The door in the center of her opens and reveals the message "What To Wear?" The fish will have a message, too, but I'm not sure what it is going to say yet.


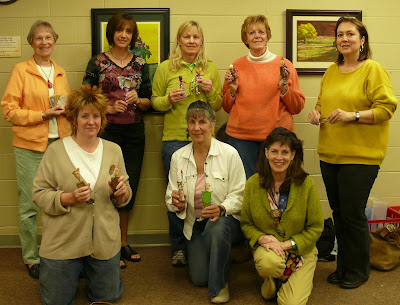
Here is the group of us at the end of the day before we departed full of ideas! I'm in the back in the middle. I'm so happy to have new polymer friends! These are the first polymer people I have met and it is so much fun to talk polymer with artists who understand and more importantly I learned something from every one of them.

Thanks, Dayle, for your warm and friendly approach to sharing your polymer ideas!

Monday, April 21, 2008

Dayle Doroshow Workshop: Chaos Cards

Dayle rolls out some clay to demonstrate a technique


Over the weekend, I traveled from my home in Aspen to Colorado Springs for a two day workshop with Dayle Doroshow, sponsored by Pikes Peak Polymer Clay Guild. After having not traveled much this winter, it was a nice road trip and the weather was great.

The first day was a workshop called Chaos Cards. Dayle had us make polymer cards that serve as inspirational jumpstarts for polymer or mixed media projects. We had the opportunity to try new techniques or revisit old ones while making these cards.


Chaos Cards I made on Saturday

I had a lot of fun with everyone in the class. Whenever I take a workshop, I always learn from seeing what the other students are doing and this weekend was no exception. 

Above is some of the cards I made. Time was short so we weren't able to do our best work, but Chaos Cards is a great idea and I will be creating more once I get home. Tomorrow I'll review the second day of Dayle's workshop.

Thursday, April 10, 2008

Fun With Tory: More Imitative Ivory

imitative ivory beads-fish 1 1/2", horse and rabbit 1"

I carved and sculpted a fish, horse, and rabbit bead, then made a two sided push mold for each design. The figures appear on both sides of the beads. I used the imitative ivory technique that I learned from Tory Hughe's book. I have been making these types of beads in ceramic for many years, but for the polymer version, I was inspired by Dayle Doroshow's Imitative Ivory Face Beads shown in Tory's book.

Speaking of Dayle Doroshow, I am taking a two day workshop with her in Colorado Springs on April 19th and 20th! I couldn't be more excited and will report back here on how the workshop went. Colorado Springs is about 225 miles from where I live, and it will be a nice weekend road trip and I look forward to meeting the clay artists of Pikes Peak Polymer Clay Guild.

Saturday, April 05, 2008

Fun With Barbara McGuire: Color Wheel

color wheel before baking

.....and a tip of the hat to Maggie Maggio who created and shared this color mixing technique.

I'd seen Maggie's videos about mixing colors on her blog, but it wasn't until I got the "Images On Clay II" by Barbara McGuire that spurred me into action to create a color wheel of beads. Maggie demonstrates using clay colors that are close to being true primaries: Premo Zinc Yellow, Cobalt Blue, and Fuchsia.

Barbara used Metallic Copper, Metallic Gold, and Pearl Blue, and the results are more earthy tones. I love that! I did a similar thing, but added some red to the copper and added some yellow to the gold to make them slightly closer (and brighter) to standard primaries while retaining the earthiness.

"Images On Clay II" is about image transfer on polymer clay, but this color mixing segment is included in the book and I highly recommend that any polymer artist who hasn't done this exercise to make a bead color wheel immediately! The link to the book is in my amazon.com list on the right. I love the secondary colors created by mixing the primaries, and plan to do more experimenting very soon.

color wheel in progress

Thursday, March 20, 2008

Polymer Techniques, Bought And Sold.

Recently Kim Cavender blogged about the subject of ethical use of polymer techniques learned from someone who is selling those techniques in the form of a workshop, book, or DVD. As Kim states, this is not a new subject but it recently popped up on her blog as a hot topic after she posted some photos of a polymer workshop or lecture (I think).

I decided when I started blogging about my polymer journey that I would share my progress via posting photos of my recent work, along with crediting and discussing the book or workshop or DVD I learned it from. I fully intend to use the techniques I paid for, just as the teacher is going to spend the money she gets from me in return for the book/workshop/DVD.

However!

Long before Kim's post, I decided not to reveal step by step techniques. Teachers deserve to be paid, and I feel that those who find my results interesting should go out and buy the book themselves. Or take the workshop. Since I am not a polymer expert, pioneer, or teacher, I am blogging about my progress and sharing what I've done. I am not only blogging, but I am logging my progress for my own future benefit as well as others who may stumble across this blog in the process of their own polymer journey.

When I am not exploring polymer I am painting in oil or watercolor. My oil painting guru is Susan Sarback, she comes from a teaching lineage going back to a contemporary of Monet. I work pretty hard to paint the best paintings I can based on her teachings. Susan teaches her students everything she knows about this method of painting, and we all go home stoked and inspired and wanting to be as good a painter as Susan. (We aren't.) Yet I can't imagine Susan showing us how she paints but then telling us not to paint like her!

So just as I pay Susan Sarback for painting workshops, I pay for lessons in polymer techniques.

What's interesting about polymer is it is so technique-based. I stand on the shoulders of some real polymer pioneers when I take that lump of clay, alter the color and shape, and come up with something worthwhile.

Yet unlike following Monet's footsteps (he made it look effortless but believe me, it is not), basic polymer techniques are generally easier to grasp with a bit of practice, and I think that's where often the feculence hits the fan. It's relatively easy to copy other people's polymer work.

What I plan to do with my own polymer work is hone in on the techniques I like, and apply my own imagery, shapes, and color combinations to the things I create using those techniques as a foundation. I wouldn't have ever experimented enough to come up with a way to make imitative ivory, but I'm glad Tory Hughes did and I plan on making some fine original work in imitative ivory. My favorite subjects, shapes and colors show up in my paintings, and they will show up in my polymer, too.

So my summary is: Learn the techniques, but use them as a springboard to your own path to artistic uniqueness. Pay homage to what you love (Flowers? Bright colors? Geometric shapes?) and your art will speak to others and become recognizably your own.

Saturday, March 15, 2008

Fun With Tory: Imitative Ivory


I just finished making my first batch of imitative ivory using the techniques in Victoria Hughes' book, Polymer The Chameleon Clay. Her ivory technique is not just getting the color right, but imitating the striations and aged look of ivory. This was the first technique in her book I tried, it is very exciting to me as I see the potential of making old looking beads.

I made some disk beads from the ivory stock, and also made two pendants, a carved turtle and a carved bird using prebaked inclusions.

Monday, March 10, 2008

Fun With Tory: Prebaked Inclusions


I recently acquired Victoria Hughes' book, Polymer The Chameleon Clay. I am having a lot of fun with it and will be doing many more posts with the results of the imitative techniques she pioneered. For starters, I made a batch of prebaked inlays for future use.

Friday, February 15, 2008

A Look Back: Street Sense Beads


This time last year, I was making 25 ceramic beads in anticipation of the Kentucky Derby. To make a long story short, I used to be in the Thoroughbred racing business and remain friends with Carl Nafzger, who trained Kentucky Derby winners Unbridled (1990) and Street Sense (2007). My husband and I were attending last year's Derby and I worked all winter to create these beads for the close associates of Street Sense. I was confident he was going to win the Derby and wanted everyone to have a memento. (I blogged extensively with lots of photos on livejournal.com about the Street Sense journey, starting with his win in the 2006 Breeders Cup Juvenile and on through Derby week, the Derby, and the Preakness.)

I worked really hard on these beads. I sculpted the original out of plasteline clay, then made a plaster mold for slip casting. After casting them in clay slip one at a time, I cleaned up the mold seam lines, painted them with underglaze in the dark brown color of Street Sense and the blue and yellow jockey's colors of Street Sense's owner. The top photo shows a few of the beads in progress, they have been underglazed and were waiting to be fired, then fired again with the clear glaze.

Though I have been working in ceramics since the mid 1990s, these beads about finished off my desire to continue working in ceramic clay. Maybe that's why a few months later I started to focus on polymer beads instead. I haven't done any ceramics since.


The good news is, of course, that Street Sense won the Derby and many of us were in the hallowed ground of the Kentucky Derby winner's circle wearing the bead necklaces I made. In the above photo of the cover of the Daily Racing Form, the woman in the white dress and hat with her hand raised is wearing my bead necklace while in the Derby winner's circle. If you click to enlarge the photo you can probably see it better.

Monday, January 28, 2008

Garden Bracelet with glass, polymer, and lucite beads


I made this bracelet recently, trying to cheer myself up and think spring in the midst of a very snowy winter. It is a Lucite Garden Bracelet that was in the spring 2007 (issue #12) of Bead Unique magazine. The article was written by Kelli Burns and Tarlee Yeoman.

Anyway, I bought the issue last year and finally got around to making this bracelet, which was a lot of fun. I made my own polymer focal bead. I still haven't done much cane work so I bought polymer flower canes on etsy and made a bead from it. I'm sure I will start making flower canes myself at some point, but I also like doing business with other artists. The flower cane was made by Seana.