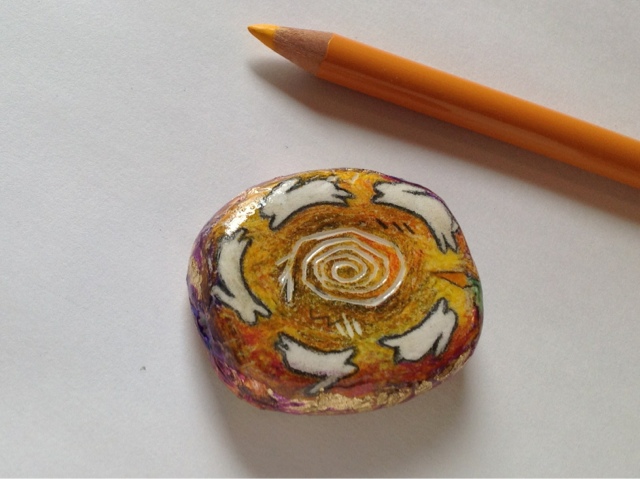
Thursday, July 02, 2009

Kathleen Dustin Container Workshop

The second Kathleen Dustin two day workshop I took in Albuquerque in June '09 was about making a hollow form, in most cases a purse. After talking about design principles, Kathleen started us off the first day by making a small hollow pendant, so we could learn the process before we tackled the larger scale of a purse.

Then in preparation for the purse, she had us make two different skinner blends.

These are my skinner blends that later became the outer decoration on my purse

Kathleen making her skinner blends, she did a beautiful blue blend and a red/gold blend.

Kathleen putting her purse together

After making the purse form, the inner lining, we put it all together. This process takes multiple bakings, but the design possibilities are endless. I have not quite finished the purse I started in the class but when I do, I will post it here. The skinner blend stripes is not something I would have thought of, it's a really beautiful end result. Also, I have been wanting to make polymer purses so I can apply my horse imagery to a 3D, functional form, so I am excited about the possibilities of making these great purses in different shapes, colors and sizes. I will be fusing what I learned in both the Translucent Techniques and purse workshops.

Taking a workshop from Kathleen Dustin is a rare opportunity, I was thrilled to get the chance to travel to Albuquerque which is less than 400 miles from where I live, and grateful that she is willing to teach the techniques she has worked so hard to develop.

Friday, June 12, 2009

Kathleen Dustin Translucent Layering Workshop

Three pendants I made during the two day workshop. Two are not quite finished.

I just did a two day Kathleen Dustin workshop in Albuquerque, New Mexico, where we learned her translucent layering techniques. It was great! Kathleen has an art background, which gives her instruction more depth beyond polymer, she talks about design and bringing your pieces to the next level beyond the ordinary.

We learned about the elements of composition within an abstract piece, translucent layering, polishing, drilling, and finishing.

One of Kathleen Dustin's pieces.

I have taken several polymer workshops and enjoyed them all, but Kathleen's techniques really helped shape a vision I have of getting my own personal imagery onto polymer. I know exactly what I want to do now as soon as I get home!

Kathleen putting gold leaf onto clay.

Student's finished pendants


Annie Hooten organized and made this workshop happen, which was a year in the making. Annie does a great job of keeping students updated prior to the workshop, and everything went smoothly. She organizes workshops on a regular basis, I highly recommend you attend one Annie is putting together.

I am attending the second Kathleen Dustin workshop this weekend, and will report my experience next week!

Tuesday, June 02, 2009

Why Making Natasha Beads Are Like Painting Watercolors

Natasha Beads

One main reason I paint in watercolor is because I love the magic that happens when colors flow into each other and create interesting abstract patterns and textures. Once upon a time those backwashes and accidental textures were frowned upon with watercolor. Everything had to be perfect. Nowadays more and more painters are shunning perfection and going with the flow by letting things happen in an abstract or partially abstract manner using ingredients such as saran wrap, salt, gesso, etc.

In polymer clay, there are lawless rogues, too--such as Natasha who created the magical Natasha bead. I have fun with these in the same way I anticipate the serendipity of watercolor. Below is a tutorial for making Natasha beads out of scraps of clay.

I cut off ends of several spiral canes and lined them up together. You don't need canes to make a Natasha bead, but at least a few cane ends can add interest the end result.


I rolled them into a log, then twisted the log several times to get the ingredients spiraling around. I then squared the log using a brayer or acrylic roller.


Cut the squared log in half.


The pattern is exposed.


Leaving the two halves in the open-face position, I then cut the halves in half again.


I flip the two outside quarter pieces onto the back, taking time to line up the design. After lining it up, I then shape it into a long, slightly squared bead, shown in the photo at the top.


So oddly enough, this bead may look to some like an intricate pattern, when in fact it is the smushing together of polymer scraps to create a one of a kind original. As in watercolor painting, all the planning in the world can not surpass the excitement of the results you often get when letting things happen by just guiding the process along.

Thursday, May 14, 2009

Donna Kato Workshop Bangle


This is the bangle I made during the recent Donna Kato workshop in Denver. See my previous posting for more photos and details.

It's hard to tell the size of the bangle from the photo but when I put it on my wrist it's bigger and clunkier than something I would normally wear. Heck, I don't normally wear bangles at all but the design possibilities are intriguing so I'd like to pursue making more. I just want to refine future bangles to be a bit more wearable than the one I made here.

I consider this bangle to be a prototype example, because in trying to get as much done in the one-day workshop, we had to rush a bit to get through all the steps. So my application was sloppy in places, with edges not meeting up perfectly. But at least I know what to do now!

The canes used in this bangle are unquestionably Donna Kato style, those who know her work recognize the zipper cane and the use of stripes in the triangle "fang" cane against a the drama of a black background. I chose to follow her color scheme in the workshop as Donna suggested to save time in not having to do too much color mixing. Donna told us how she mixed these colors, but interestingly, despite the precision of her cane making, the way she told us to go about mixing colors was less precise: "a lot of this, less of that, and a dash of this."

What was cool about the red and orange in the zipper and fang cane is that up close the stripes are undoubtedly two different colors, but viewed from further away the red and orange merge and look rust colored, which is a color I love combined with lime green.

I also like the wavy shape of the base, I am not into perfection or symmetry so the free form shape is right up my alley. The zipper cane pulls it together though into a bit of order and it really makes a nice border, leaving the door open for interpretation inside those borders.

Sunday, May 10, 2009

Donna Kato Workshop- Denver '09

Ok, you know about the Skinner Blend, the Natasha Bead...have you ever done the Jana Whack? Named for Jana Roberts Benzon's method of conditioning the notoriously stiff Kato clay, that's how we started off our recent Donna Kato workshop in Denver. We brought our rubber mallets and pounded the Kato clay while still in it's package until it was partially flattened, then we were able to continue conditioning with our hand rolling devices and pasta machines.

The Jana Whack on Kato Clay


This workshop was about building bangles. Most of my own polymer work is small and doesn't have too many steps, I finish things quickly and move on to the next thing. But Donna's bangles are quite a beautiful sight to behold and it was informative and worthwhile to spend the day making one item, which required many steps and many trips to the baking oven.


Donna with the base form of her bangle

Everyone made a black base form then we moved on to adding canework. With a lot to do in one day, Donna suggested we stick with her color scheme to save color mixing time. I was happy to do that as I liked the colors she used: orange, red, and lime against the black base form.

The canes we made were the very effective "zipper" cane, and a "fang" cane which incorporated stripes as well as a Skinner Blend plug. Those plugs are great--Donna has the tutorial for them in her latest book, The Art Of Polymer Clay Millefiori Techniques.

everyone happily working on their bangle forms


Donna shows us the striped cane


Donna puts the finishing touches on her bangle at the end of the day


I didn't quite finish my bangle by the time the class was over, so when I finish it I will post it in my next blog entry. (And I can't wait to make more bangles after I finish the first one.)

It was a fun day, I enjoyed my first-ever workshop with Donna Kato. She is a pro, and it shows in her teaching style as well as her final results.

Wednesday, May 06, 2009

Julie Picarello Mokume Gane Workshop

Julie Picarello describing her mokume gane technique


I recently attended a Julie Picarello mokume gane workshop in Colorado Springs, Colorado. It was part of a ten day road trip so I am just getting home and posting some photos. I enjoyed taking Julie's workshop and highly recommend it even if you have already done mokume gane, it's always informative to learn from someone who specializes in a particular technique. Julie is nice and fun to be around, as are all the members of the Pikes Peak Polymer Clay Guild.


My own mokume gane slices made during the workshop.


Mokume gane beads/pendants made by workshop participants on the first day of the workshop. There are some stunningly good polymer artists with great color sense at this clay guild!

Sunday, April 12, 2009

Easter


I like to make necklaces to celebrate holidays and other special events. I just finished this one in the nick of time for Easter. It's my own faux ivory rabbit heart focal bead, surrounded by smaller faux ivory and spring/Easter colored polymer beads. The beads hanging at the bottom are glass flower beads, I've had them in my bead stash for quite awhile now and it was nice to find the right place for them in the necklace arrangement.

Happy Easter everyone!